You’ve spent time and effort making your yard a perfect oasis, but nature has other plans. Out of nowhere, a stubborn sapling sprouts up along your fence line, or a patch of determined weeds begins its hostile takeover of your flower bed. Unwanted growth can quickly turn a tidy landscape into a wild mess, but don't worry—we're here to help you reclaim your space.
Figuring out how to deal with these intruders can be confusing. Is it a simple weed you can pull by hand, or is it the beginning of a tree that will soon have roots threatening your foundation? Knowing the difference is the first step toward an effective solution.
In this guide, we'll walk you through everything you need to know, just like a friendly expert over the phone. We'll help you identify what you're dealing with, provide step-by-step instructions for safe DIY removal, and clarify when a job is too big or too risky to handle on your own. Let's get that yard back in shape!
Step 1: Identify the Unwanted Growth—Is It a Tree or a Weed?
Before you grab a shovel or a sprayer, let's play detective. Misidentifying your leafy culprit can lead to wasted effort. A method that works for weeds might just make a tree sapling come back stronger.
Here’s how to properly identify what’s growing in your yard:
- Get Up Close: Put on a pair of work gloves and examine the plant. Look at its main stem or trunk.
- The Bend Test: Try to bend the main stem. Does it feel flexible and green like a typical weed, or is it stiff and woody? If it snaps rather than bends, you're likely dealing with a tree or shrub.
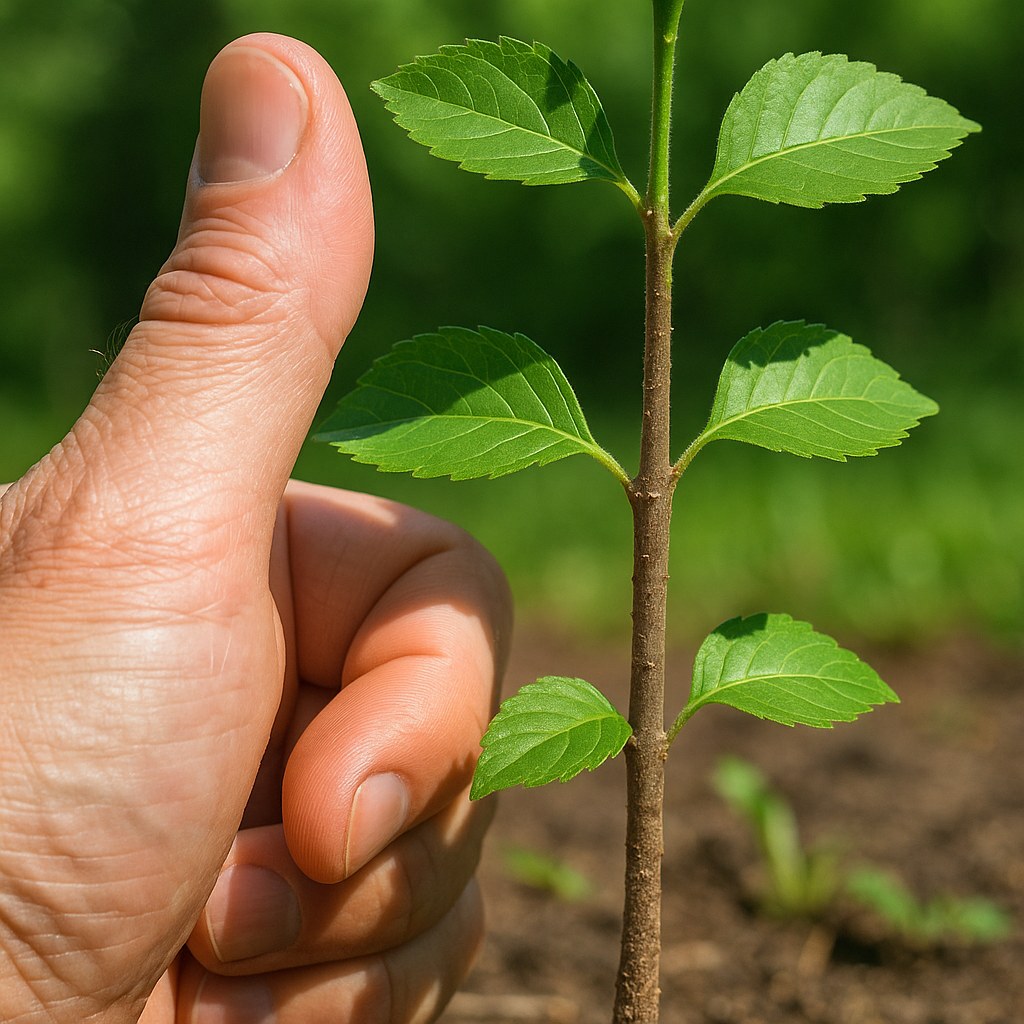
- The Thumb Test: This is a great rule of thumb (pun intended!). Place your thumb against the base of the main stem. If the stem is thicker than your thumb, it's a significant woody plant. If it’s thinner, it’s either a very young sapling or a large weed.
- Measure the Area: If you’re dealing with a patch of non-woody plants, pace out the length and width of the area they cover. Multiply these numbers to get a rough square footage. This will help you decide if manual removal is feasible or if you need another strategy.
- Check for Hazards: This is a crucial safety check. Look up and around the plant. Are there any overhead utility lines within about 10 feet? Is the plant growing close to your house, a fence, a shed, or other delicate plants? Proximity to structures or power lines can make removal dangerous and is often a sign to call a professional.
Once you’ve answered these questions, you’ll know whether you’re up against a small sapling or a patch of weeds, and you can move on to the right removal method.
Step 2: How to Remove Small Unwanted Trees and Saplings
If your investigation revealed a woody plant with a trunk diameter of less than 2 inches, and it's located safely away from any structures or power lines, you have a green light for a DIY removal. Taking care of it now prevents a much bigger, and more expensive, problem later.
Tools You'll Need:
- Work gloves
- Safety glasses
- Hand pruners
- A round-point shovel
- A garden hose or watering can
Follow These Steps:
- Safety First: Put on your gloves and safety glasses. Even small branches can whip back and cause injury.
- Clear the Way: Use your hand pruners to trim off any small side branches from the main trunk. This gives you a clear and safe space to work around the base of the sapling.
- Soften the Soil: Water the ground around the base of the sapling thoroughly for about five minutes. Moist soil is much easier to dig in and will help the roots release their grip.
- Cut the Roots: Stand with the shovel about 6 inches away from the sapling's trunk. Push the shovel blade straight down into the soil with your foot, cutting through the shallow roots. Pull the shovel out and repeat this process in a circle all the way around the trunk.
- Pry and Loosen: Once you’ve circled the tree, push the shovel back into one of your cuts and use it as a lever. Pry upwards to loosen the root ball. You should feel the sapling start to give.
- Pull It Out: Grab the trunk firmly and rock it back and forth while continuing to pry with the shovel. With a final pull, the sapling and its root ball should come out of the ground. Try to keep the root ball as intact as possible to minimize soil disruption.
- Fill the Hole: Use your shovel to back-fill the hole with the surrounding soil. Tamp it down gently with your foot to eliminate air pockets.
Step 3: What to Do About a Lingering Stump
Sometimes, even with your best effort, a piece of the trunk or a few large roots remain in the ground, creating a small stump. Don't ignore it! A leftover stump can resprout, and you'll be right back where you started. To finish the job for good, you’ll need to treat it with an herbicide.
Tools You'll Need:
- Disposable gloves
- Safety glasses
- A hand saw
- Stump killer herbicide (available at garden centers)
- A plastic bag and duct tape
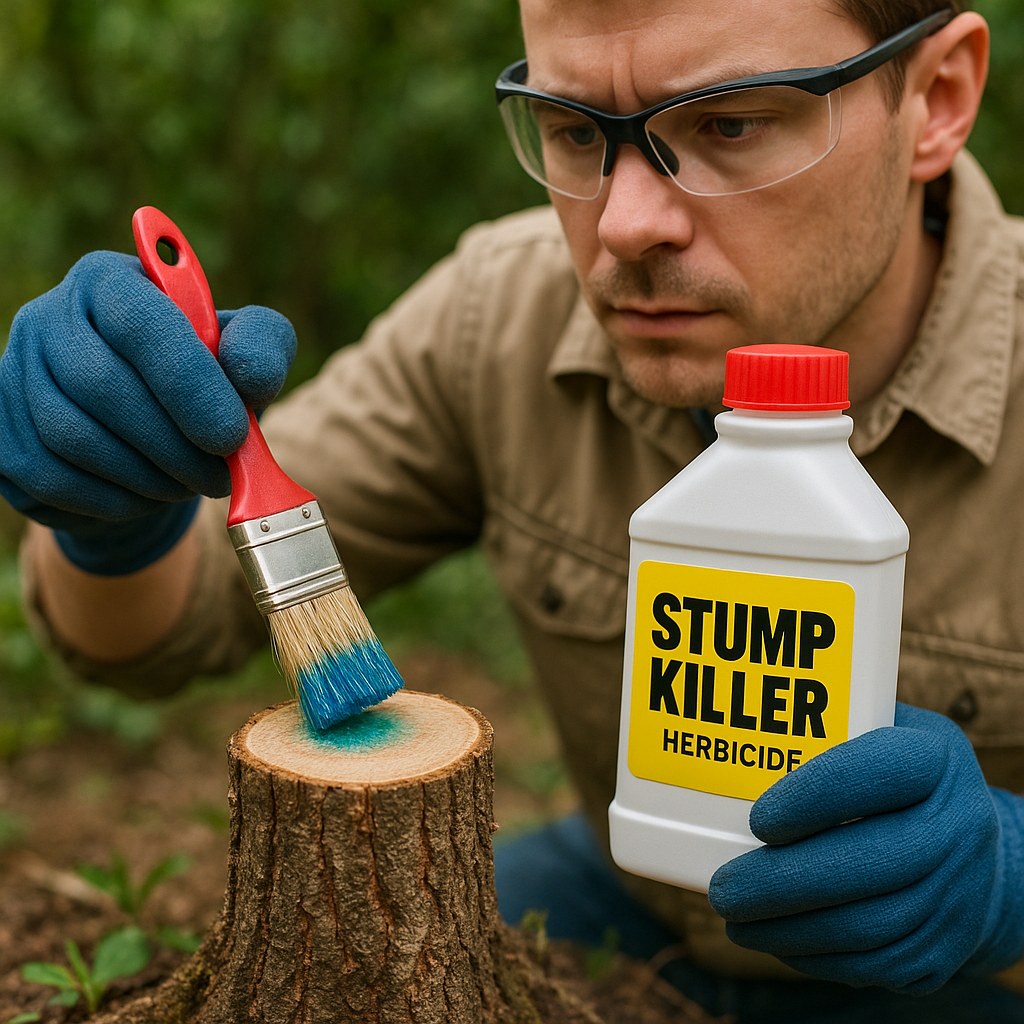
How to Apply Stump Killer:
- Protect Yourself: Put on disposable gloves and safety glasses. Stump-killing chemicals are potent and should not come in contact with your skin or eyes.
- Make a Fresh Cut: Use your hand saw to make a clean, flat cut across the top of the stump. A fresh cut is essential because it allows the wood to absorb the herbicide effectively. You must apply the herbicide within 15-20 minutes of making the cut.
- Apply the Herbicide: Most stump killers come with a brush applicator. Carefully coat the entire surface of the fresh cut, paying special attention to the outer ring (the cambium layer), which is the most active part of the plant.
- Cover It Up: For extra effectiveness and to protect pets or wildlife from the chemical, cover the treated stump with a plastic bag and secure it tightly at the base with duct tape. Leave it covered for at least 24 hours.
- Monitor the Area: After removing the bag, the stump will begin to dry out and rot over several weeks or months. Keep an eye on it. If you see any green shoots appear after a month, it may mean the treatment didn't fully take, and it’s time to call a professional arborist for advice.
Step 4: Winning the War on Large Weeds
If your problem turned out to be non-woody weeds, your approach will depend on the size of the infestation.
For Smaller Patches (Under 50 sq. ft.): Manual Removal
There’s nothing quite as satisfying as pulling a stubborn weed out, roots and all. For smaller patches, this is often the quickest and most eco-friendly solution.
- Gear Up: Put on a pair of work gloves and consider using knee pads for comfort.
- Water the Area: Just like with saplings, lightly watering the weed patch will soften the soil and make pulling easier.
- Pull with Precision: Grip each weed as low to the ground as possible. Pull upward with a slow, steady twisting motion. This prevents the stem from snapping off and leaving the root crown in the soil.
- Bag the Debris: Shake the excess soil from the roots and toss the weed into a yard-waste bag. Don't leave them on the ground, as some weeds can re-root or drop seeds.
- Do a Final Sweep: Use a rake to gently comb through the soil to uncover any missed roots or fragments. Collect and bag these as well.
For Larger Patches or Stubborn Roots: Systemic Herbicide
If you're facing a large area of weeds or if manual pulling left a lot of roots behind, a systemic herbicide may be necessary. "Systemic" means the chemical is absorbed by the leaves and travels down to kill the entire plant, including the roots.
Important Safety Precautions:
- Always wear protective gear: Disposable gloves, safety glasses, and long sleeves are a must.
- Choose the right day: Apply herbicides on a calm, dry day with no rain in the forecast for at least 24 hours. Wind can cause the spray to drift onto desirable plants.
- Read the label: Always follow the manufacturer's instructions for mixing and application.
How to Apply:
- Mix the Solution: Fill a pump sprayer with a glyphosate-based herbicide according to the label directions.
- Set the Nozzle: Adjust the sprayer nozzle to a coarse setting. A fine mist is more likely to drift in the wind.
- Protect Other Plants: Use a piece of cardboard as a shield to protect nearby flowers, shrubs, or lawn grass from overspray.
- Spray Evenly: Mist the leaves of the target weeds until they are wet but not to the point of dripping.
- Clean Up: Thoroughly rinse your sprayer with clean water after you’re finished.
- Be Patient: Systemic herbicides can take up to 14 days to fully work. If the weeds are still green after two weeks, you may need a second application or consider calling a professional.
When to Call in the Professionals
The satisfaction of a DIY job is great, but knowing your limits is the most important part of home maintenance. Some jobs are simply too big, too complex, or too dangerous to tackle on your own.
Call a Certified Arborist for Trees if:
- The trunk diameter is more than 2 inches.
- The tree is within 10 feet of your home, a fence, or overhead utility lines.
- The tree is a species known for aggressive root systems.
Professionals have the training, insurance, and specialized equipment to remove trees safely without damaging your property or risking injury. According to Forbes Home, professional removal of a small tree can cost between $200 and $500, a worthwhile investment for safety and peace of mind.
Call a Landscape Professional for Weeds if:
- The weed patch is larger than 50 square feet and you're not comfortable using chemical herbicides over such a large area.
- You've tried DIY methods, but the weeds keep coming back.
Landscapers can identify the specific type of weed and use targeted treatments that are more effective and safer for the surrounding environment.
Take Control of Your Yard with Casa
Tackling unwanted trees and weeds is a common homeowner challenge, but with the right approach, it's one you can certainly manage. By correctly identifying the problem and assessing the risk, you can confidently decide whether to roll up your sleeves or call for backup.
For more expert guidance on all your home maintenance projects, download the Casa app! Our easy-to-follow, step-by-step guides empower you to handle countless DIY jobs around the house. And for those bigger tasks that require a professional touch, Casa connects you with a network of vetted, trusted pros in your area. Let Casa be your partner in creating and maintaining the home of your dreams.


