That sinking feeling when you spot a dark, ugly burn mark on your otherwise pristine carpet is all too familiar. Maybe it was a fallen ember from the fireplace, a dropped cigarette, or a hair straightener left in the wrong spot for just a second too long. Whatever the cause, your first thought is probably, "Do I have to replace the entire carpet?"
The good news is, in most cases, you don't. Fixing a carpet burn mark is a very manageable DIY project. Whether it’s a minor scorch on the surface or a deeper burn that’s melted the fibers, there’s a solution that can make your carpet look as good as new without breaking the bank.
This guide will walk you through everything you need to know, from assessing the severity of the burn to choosing the right repair method. Let's get that carpet looking flawless again!
Why Do Carpet Burns Happen?
Carpet burns are typically caused by intense, direct heat that melts or singes the synthetic fibers (like nylon, polyester, or olefin) that most modern carpets are made from. Common culprits include:
- Cigarettes or cigars
- Hot embers from a fireplace or grill
- Dropped hair styling tools (curling irons, straighteners)
- Sparks from welding or grinding
- Household items like fallen clothes irons or hot pans
Understanding the cause can help, but the most important first step is figuring out how bad the damage really is.
Step 1: Assess the Burn Damage
Before you grab any tools, you need to properly diagnose the problem. The type of repair you’ll perform depends entirely on the depth and size of the burn.
First things first, clear the area. Move any furniture out of the way so you have plenty of room to work. Then, grab your vacuum and go over the burn area to suck up any loose debris, ash, or charred fiber fragments.
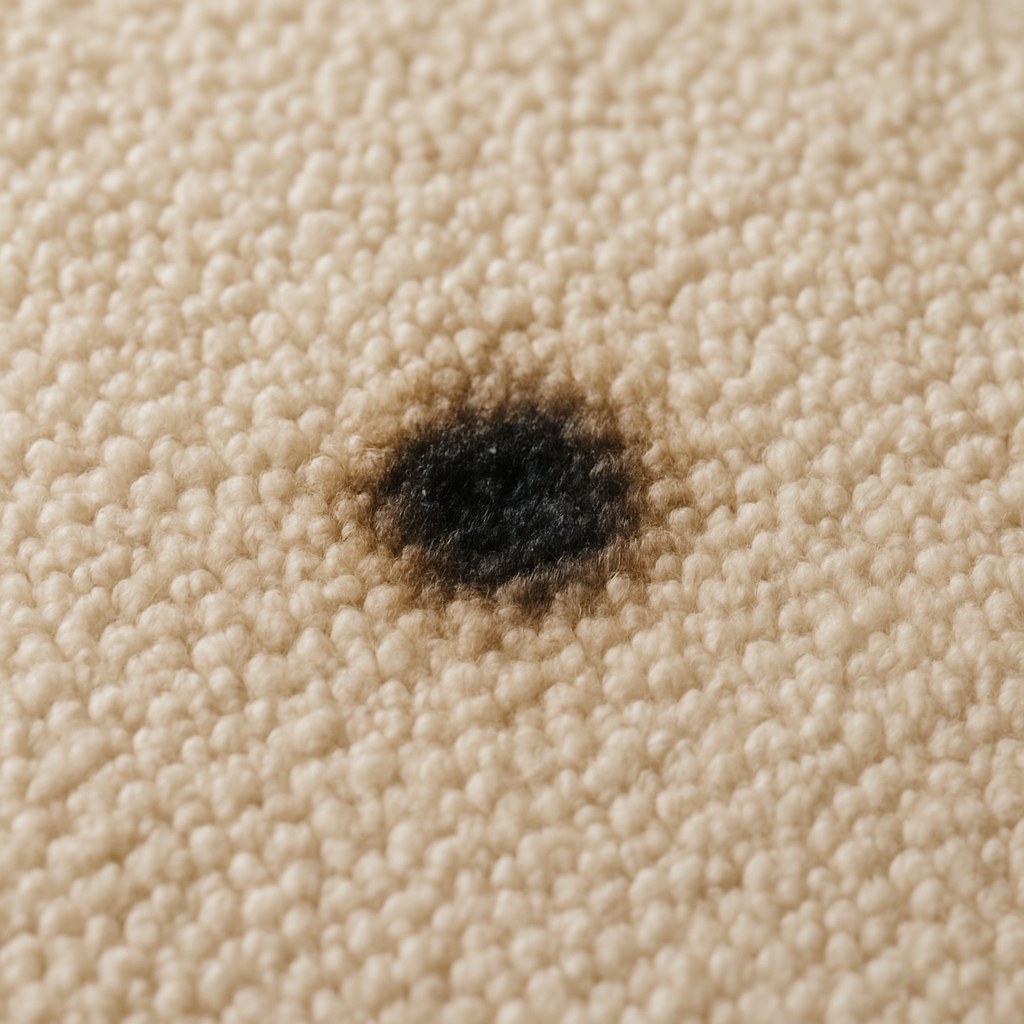
Now, get down for a closer look. You're trying to determine if you have a superficial burn or a deep burn.
- Superficial Burn: This is the best-case scenario. The burn has only singed the very tips of the carpet fibers. The fibers are darkened and stiff, but they are still mostly intact. There is no visible hole, and you can't see the carpet's backing material.
- Deep Burn: This is more serious. The heat has melted the fibers completely, creating a noticeable hole or crater. You can likely see the woven carpet backing or, in severe cases, the padding underneath.
Once you’ve identified the type of burn, you can move on to the appropriate repair method.
How to Repair a Superficial Carpet Burn
If you've determined the burn is just on the surface, you're in luck. This is the easiest type of carpet burn to fix, and it often results in a nearly invisible repair.
Tools and Materials You'll Need:
- Small, sharp scissors (like cuticle or craft scissors)
- Work gloves
- Strong carpet adhesive
- Wax paper
- A small, heavy object (like a book)
Step-by-Step Instructions:
- Trim the Damaged Fibers: Put on your work gloves. Carefully use your sharp scissors to snip off just the blackened, burnt tips of the carpet fibers. Be precise and try not to cut them shorter than the surrounding, undamaged fibers.
- Harvest Replacement Fibers: Find an inconspicuous spot of the same carpet to source some replacement fibers. Inside a closet, under a large piece of furniture, or on a leftover scrap piece are all excellent options. Snip a small number of fibers from the base, making sure they are long enough for the repair.
- Apply Adhesive: Squeeze a tiny drop of carpet adhesive directly into the trimmed area where the burn was. A little goes a long way here; you don't want the glue to ooze out and stiffen the surrounding carpet.
- Place the New Fibers: Using your fingers or a pair of tweezers for more control, carefully place the replacement fibers into the drop of adhesive. Make sure to orient them so their pile direction matches the rest of the carpet. This is key to making the patch blend in.
- Set the Repair: Place a small piece of wax paper over the freshly glued fibers. Press down gently but firmly with your palm for about 30 seconds. The wax paper prevents the glue from sticking to anything else.
- Let It Dry: Remove the wax paper and place a heavy book on top of the repair area. Let the adhesive dry completely according to the manufacturer's instructions, which is typically at least one hour. Avoid walking on the area during this time.
Once dry, fluff the fibers with your fingers. In most cases, the repaired spot should blend seamlessly with the surrounding carpet.
How to Fix Deep Carpet Burns
If the burn has created a hole and exposed the carpet backing, trimming the fibers won't be enough. You’ll need to perform some "carpet surgery" by either replacing a tile or creating a patch.
Method 1: Replacing a Burnt Carpet Tile
If your carpet is made of modular tiles, this is by far the easiest way to fix a deep burn. Hopefully, you have a spare tile left over from the installation.
Step-by-Step Instructions:
- Pry Up the Damaged Tile: Using a putty knife or a flathead screwdriver, gently pry up one corner of the burnt carpet tile. Once you have a good grip, lift the tile straight up to release it from the adhesive on the subfloor.
- Clean the Subfloor: After removing the tile, scrape away any old adhesive residue left on the subfloor with your putty knife. You want a clean, smooth surface for the new tile.
- Install the New Tile: Take your new, matching carpet tile. If it has a peel-and-stick backing, remove the protective film. Carefully align the new tile with the surrounding pattern and pile direction, then press it firmly into place.
- Secure the Bond: Walk over the new tile several times, applying pressure with your heels to ensure the adhesive makes a strong bond with the subfloor.
That's it! As long as the new tile is level with the others, your carpet is fixed.
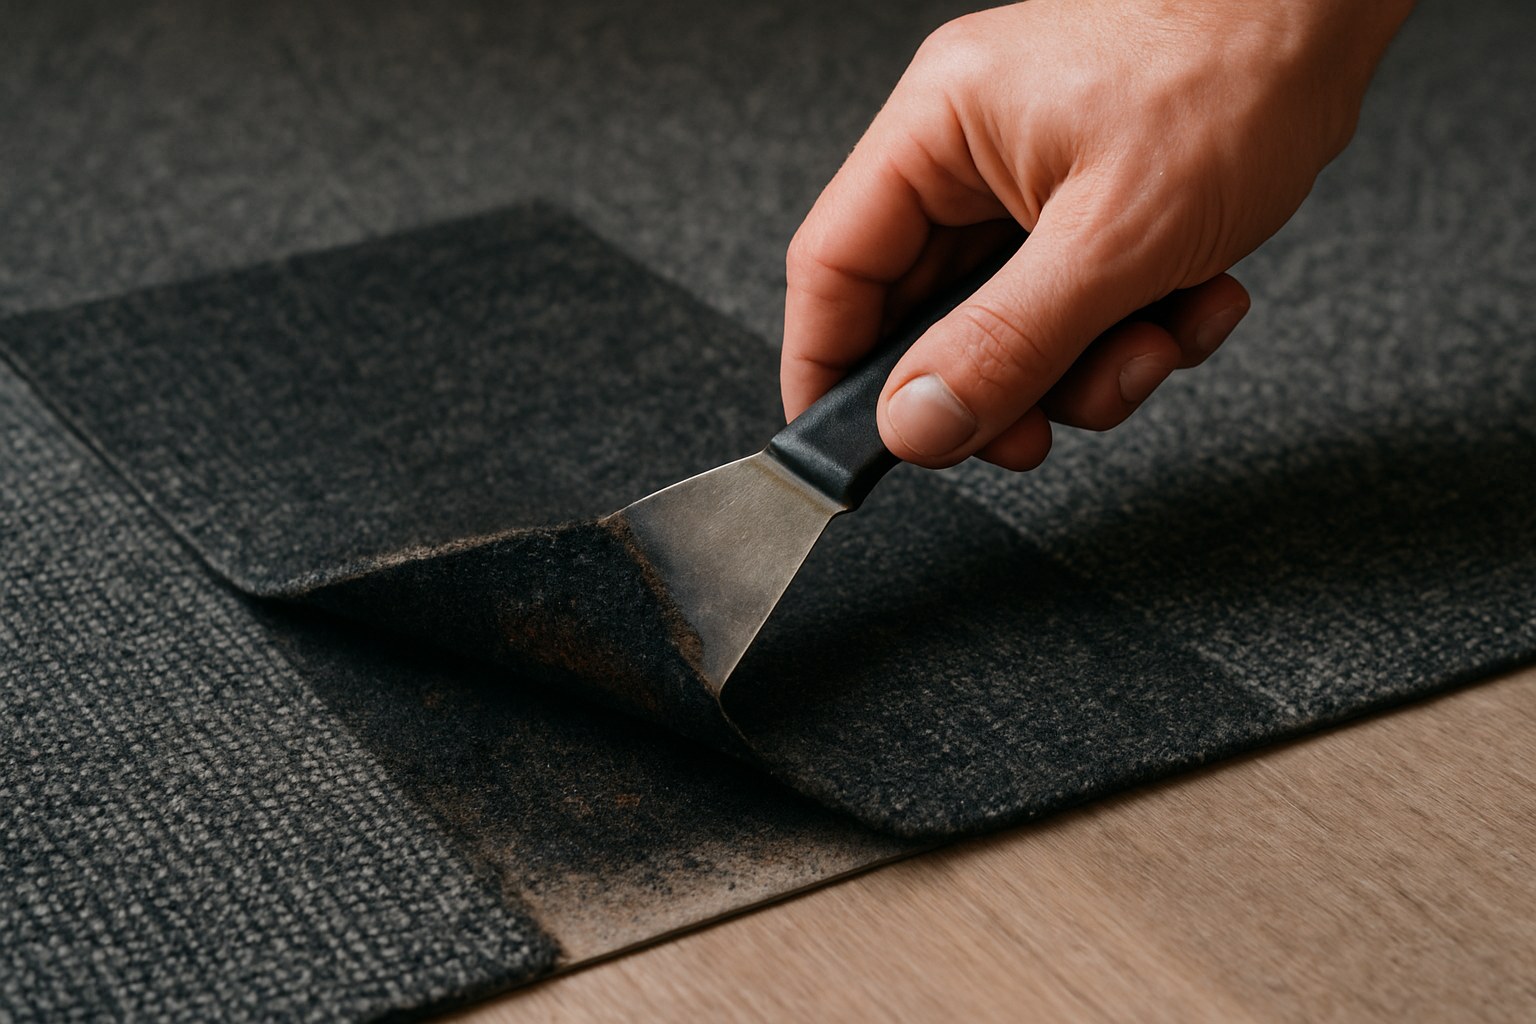
Method 2: Patching a Burn in Wall-to-Wall Carpet
This method is for standard wall-to-wall carpeting and requires a bit more precision, but it's still very achievable. You'll need a matching piece of scrap carpet to use as a donor patch.
Before you start, check the padding. If the padding underneath the carpet is also scorched or melted, it will need to be replaced. This is a more complex job, and it's often best to call a professional to avoid lumps or unevenness in your floor. A professional repair for a small patch typically costs between $125 and $250.
If the padding is fine, you can proceed with the patch.
Tools and Materials You'll Need:
- Utility knife with a sharp blade
- Metal ruler or straight edge
- Felt-tip marker
- Double-sided carpet tape
- A heavy book
Step-by-Step Instructions:
- Cut Out the Damage: Place your metal ruler around the burn mark. Using your utility knife, carefully cut a neat square or rectangle around the damaged area. Keep the hole as small as possible, ideally under 2 inches. Press firmly to cut through the carpet and its backing.
- Create the Patch: Take the damaged piece you just removed and place it on the back of your donor carpet scrap. Trace its outline with your marker. Using your utility knife, cut out the new patch from the donor piece, following the traced lines.
- Apply Carpet Tape: Place strips of double-sided carpet tape inside the hole, on the exposed subfloor or backing, with the sticky side facing up. Make sure the tape covers the edges where the patch will sit.
- Insert the Patch: Carefully place your new patch into the hole. Pay close attention to the pile direction. Run your hand over the surrounding carpet and the patch to ensure the fibers are all leaning the same way. An incorrectly oriented patch will stick out like a sore thumb.
- Secure the Patch: Press the patch down firmly into the tape. Ruffle the fibers along the seam with your fingers to help blend the edges.
- Add Weight: Cover the patch with a heavy book and leave it for at least an hour (or longer, depending on your tape's instructions) to ensure a strong, lasting bond.

When Should You Call a Professional?
While DIY repairs are great for small burns, some situations are best left to a professional carpet repair specialist. Consider calling for help if:
- The burn mark is larger than a couple of inches in diameter.
- The carpet padding underneath is significantly damaged.
- You don't have a spare piece of matching carpet for a patch.
- The burn is in a very high-traffic, highly visible area where a perfect seam is critical.
- You’ve tried a DIY repair and aren’t happy with the results.
Professionals have specialized tools and techniques, like heat-bonding seams, that create a truly invisible mend.
Your Carpet Is Saved!
A burn mark doesn't have to be a permanent scar on your floor. With a little bit of patience and the right technique, you can easily repair the damage yourself and restore your carpet's beauty. By assessing the burn and following these steps, you can save hundreds of dollars on professional fees or premature carpet replacement.
For more expert guides on tackling common home repairs, and to connect with trusted professionals for the jobs you can't handle alone, download the Casa app today! We’re here to give you the confidence to manage and maintain your home like a pro.


