That soft, crumbly spot at the bottom of your door is more than just an eyesore—it’s a sign of wood rot. Whether it's your front door facing the elements or a bathroom door battling humidity, rot can compromise your home's security, energy efficiency, and appearance. You might notice peeling paint, a musty odor, or even a door that feels loose in its frame.
The good news is you've caught it, and in many cases, fixing a rotting door is a manageable DIY project. Ignoring it, however, can lead to more extensive and costly damage to the door frame and surrounding wall.
Here at Casa, we believe in empowering you to handle home maintenance with confidence. We’ll walk you through everything you need to know, from diagnosing the severity of the rot to making the repair yourself. Let’s get that door back in solid, working condition.
Why Do Doors Rot? Understanding the Cause
Before we jump into the fix, it helps to understand the enemy. The single biggest cause of wood rot is moisture. When wood is consistently damp, it becomes a breeding ground for fungi that break down the wood fibers, turning solid lumber into a soft, spongy mess.
For exterior doors, the culprits are usually:
- Rain and Snow: Direct exposure to weather, especially wind-driven rain, can saturate the wood.
- Poor Drainage: Water pooling near the threshold can wick up into the door and frame.
- Sprinklers: Automated sprinkler systems hitting the door day after day are a common cause of rot.
- Failed Caulking: Gaps in the caulking around the door frame allow water to seep in behind the scenes.
For interior doors, the cause is almost always high humidity, typically found in:
- Bathrooms: Steam from hot showers creates a constantly damp environment.
- Basements: Basements are naturally prone to dampness and humidity.
- Laundry Rooms: The moisture from washers and dryers can also contribute.
Now that we know what we're up against, let's figure out how bad the damage is.
Step 1: Inspect the Damage and Diagnose the Problem
First things first, we need to determine if your door is an exterior or interior door, as the repair process and replacement options differ. Then, we’ll assess the extent of the rot. Grab a flathead screwdriver—it’s going to be your best diagnostic tool.
For Exterior Doors:
- Safety First: Put on a pair of safety glasses to protect your eyes from any wood chips or debris.
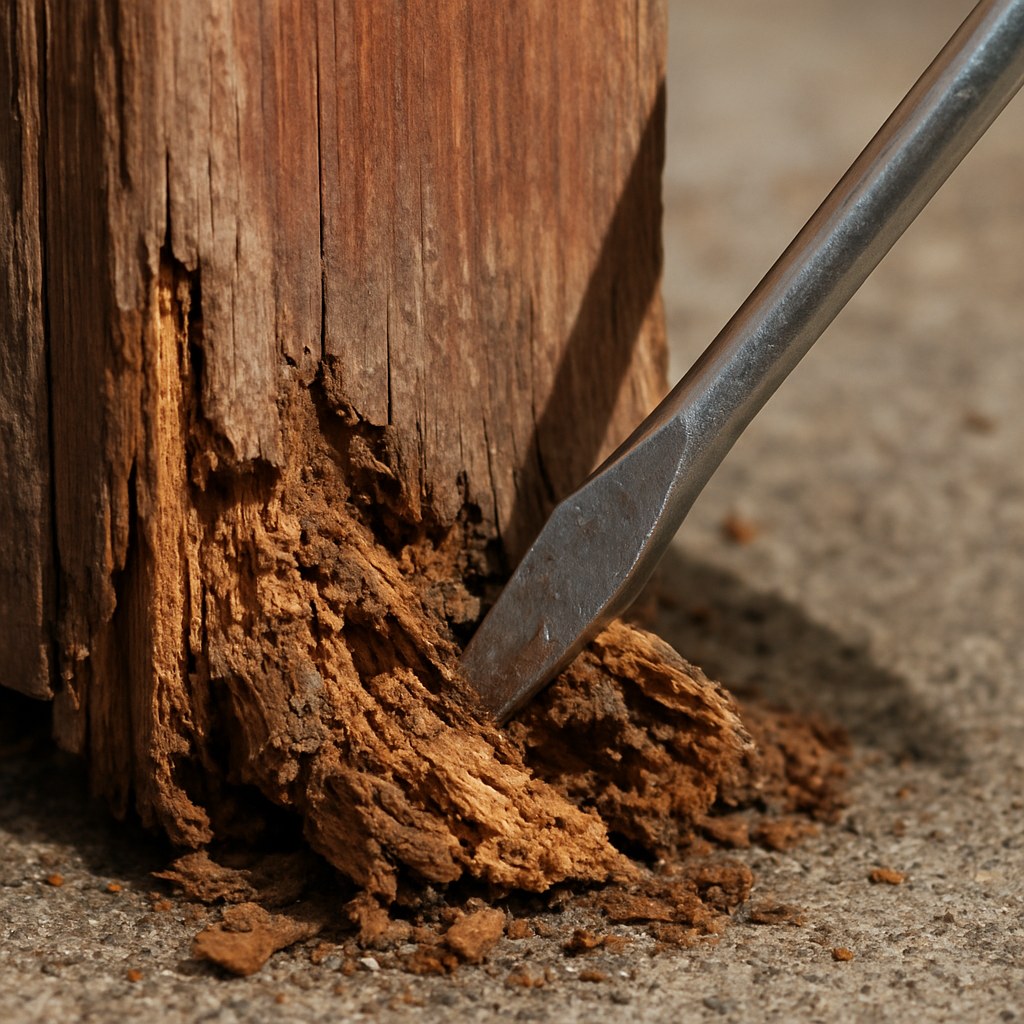
- The Poke Test: Gently press the tip of your screwdriver into any dark, discolored, or soft-looking spots on the door and frame. If the wood is healthy, the screwdriver won't sink in. If it’s rotted, it will feel soft and spongy.
- Check the Bottom: Pay close attention to the bottom edge of the door and the threshold. These areas are ground zero for water damage.
- Assess the Scale: Is the rot contained to a small spot, or is a large portion of the door or frame affected? If the frame itself is soft and crumbling, the problem is more serious.
For Interior Doors:
- Hollow vs. Solid: Start by knocking on the door. A deep, hollow sound means you have a hollow-core door (common for interior rooms). A solid thud means it’s a solid-core or solid wood door. This is a critical distinction because hollow-core doors with rot are almost always replaced, not repaired.
- Perform the Poke Test: Just like with an exterior door, use your screwdriver to gently probe any suspect areas, particularly near the bottom and around the hinges.
- Check the Frame: Examine the door frame, especially the parts closest to the floor, for any signs of swelling or softness.
After your inspection, you’ll face a key decision: is this a simple repair, or is it time for a full replacement?
Step 2: Repair or Replace? Making the Right Call
Here’s a simple breakdown to help you decide:
You should REPAIR the door if:
- The rot is limited to a small, localized area (e.g., a spot a few inches wide).
- The rest of the door and the door frame are structurally sound.
- The door is a high-quality solid wood door that would be expensive to replace.
You should REPLACE the door if:
- The rot is extensive, covering a large portion of the door.
- The door frame itself is rotted. (If just the frame is rotted, you might only need to replace that, but it's a job often best left to a pro).
- It's a hollow-core interior door. The cost of a new hollow-core door is often less than the time and materials needed for a proper repair.
- The door is warped or no longer fits properly in its frame.
Step 3: How to Repair Minor Wood Rot
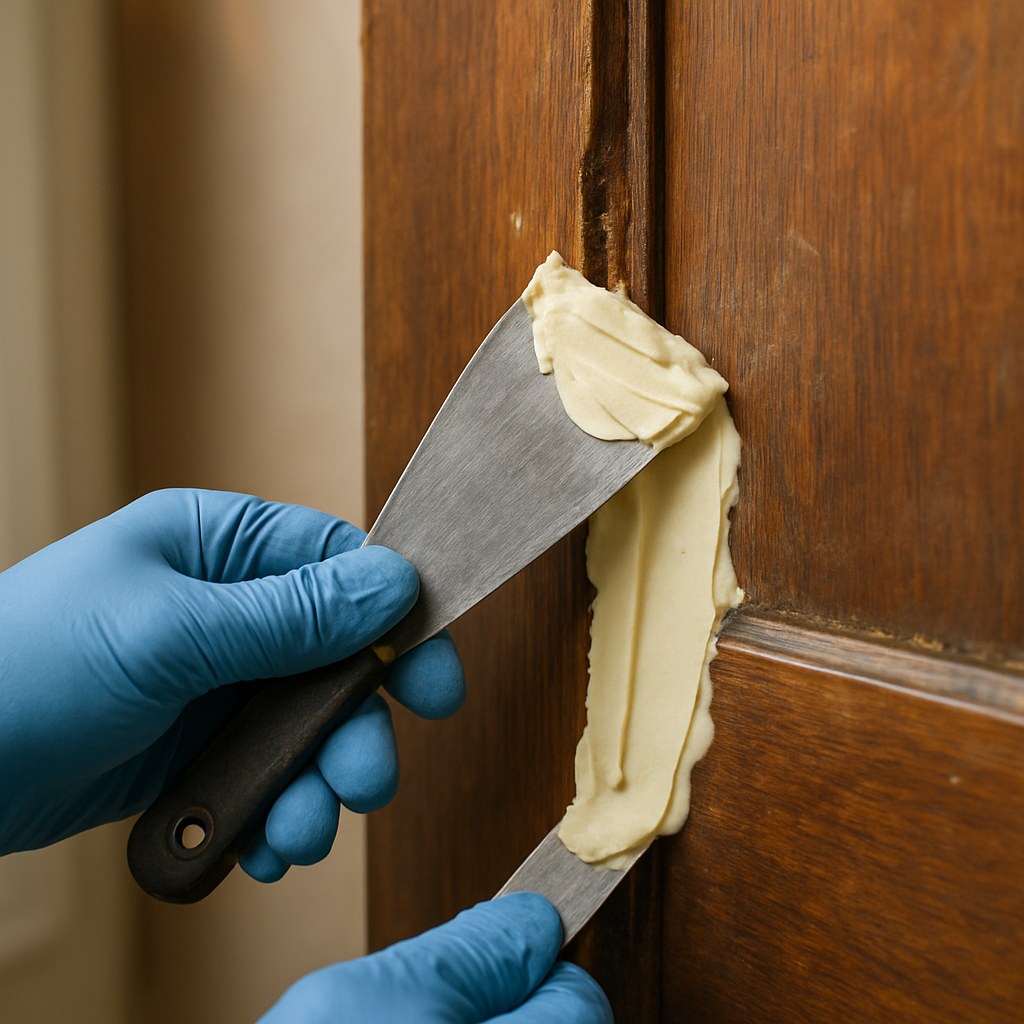
If you've determined the rot is minor and localized, you can perform a lasting repair using epoxy wood filler. This two-part product creates a tough, waterproof, and sandable patch that becomes as strong as the wood itself.
Tools and Materials You'll Need:
- Safety glasses and an N95 mask
- Putty knife or 5-in-1 tool
- Medium-grit sandpaper (around 120-grit)
- Epoxy wood filler/consolidant kit
- Paintbrush (for applying consolidant)
- Exterior or interior primer and paint (to match your door)
- Caulk (for exterior doors)
Here's the step-by-step process:
- Remove the Rotted Wood: Using your putty knife, scrape and dig out all the soft, crumbly wood. You need to get back to solid, healthy wood fibers. Don’t be shy here; remove every last bit of decay.
- Sand the Area: Roughen up the healthy wood around the cavity you just created with medium-grit sandpaper. This helps the epoxy get a better grip.
- Clean Up: Brush or vacuum away all the dust and debris. The area must be clean and dry for the epoxy to bond correctly.
- Apply Wood Consolidant: Most epoxy kits come with a thin, liquid wood consolidant (or hardener). Brush this onto the exposed, healthy wood inside the cavity. This liquid soaks into the wood fibers and strengthens them, creating a solid base for the filler. Let it soak in for about 10 minutes or as directed by the manufacturer.
- Mix and Apply the Filler: Mix the two parts of the epoxy filler according to the package directions. Once mixed, you have a limited time to work with it before it starts to harden. Press the filler firmly into the cavity with your putty knife, ensuring you fill any gaps and voids.
- Shape the Repair: Overfill the cavity slightly, so the filler is "proud" (sticking out a bit) of the door's surface. This gives you material to sand down for a perfectly flush finish.
- Let It Cure: Patience is key. Let the epoxy cure completely. This can take anywhere from 1 to 4 hours, or even longer depending on the temperature and humidity. Check the product instructions.
- Sand It Smooth: Once fully cured, sand the hardened filler down until it's perfectly flush and smooth with the rest of the door surface.
- Prime and Paint: Wipe away all sanding dust. Apply a coat of primer to the repaired area. Once the primer is dry, paint the patch to match the rest of your door.
- Seal It Up (for Exterior Doors): For an extra layer of protection, check for any gaps at the bottom of the door or threshold and apply a bead of exterior caulk to seal out moisture for good.
Step 4: When and How to Replace a Rotted Door
If the damage is too great, replacement is your best bet. Replacing a door slab (the door itself) is a moderately difficult job, while replacing the entire pre-hung unit (door plus frame) is more advanced. For this guide, we'll focus on replacing just the slab.
The process for a hollow-core interior door and a solid door is similar, but a solid door is much heavier and may require an extra set of hands.
- Remove the Old Door: Close the door and use a nail punch and hammer to tap the hinge pins out. Once the pins are out, you can lift the door slab off the hinges.
- Measure and Match: Measure the height, width, and thickness of your old door precisely. Take these measurements to the hardware store to buy a matching replacement slab. Also note the location of the doorknob and hinges.
- Transfer the Hardware Locations: Lay the new door slab on sawhorses. Place the old door directly on top of it, aligning them perfectly. Carefully trace the outlines for the hinges and the location for the doorknob and latch onto the new door.
- Cut the Mortises and Holes: This is the most technical part. You’ll need a sharp wood chisel to carefully carve out the hinge recesses (mortises). A hole saw kit is used to drill the holes for the doorknob and latch assembly.
- Install Hardware and Hang: Screw the hinges onto the new door. With a helper, lift the door into the frame, align the hinges, and slide the hinge pins back into place. Install the doorknob and latch. Test the door to ensure it swings freely and latches securely.
How Much Does It Cost to Fix a Rotting Door?
Making the decision between DIY repair and hiring a professional often comes down to cost and complexity.
- DIY Repair: A DIY repair kit with epoxy wood filler and consolidant is very affordable, typically costing $20 to $40. Add in sandpaper, primer, and paint, and you’re likely all-in for under $75.
- DIY Replacement (Slab Only): A new interior hollow-core door slab can cost as little as $50 to $150. A solid wood exterior door slab will be significantly more, ranging from $250 to over $1,000.
- Hiring a Carpenter: According to HomeGuide, the cost to have a professional repair wood rot on a door can range from $150 to $400, depending on the extent of the damage. A full door replacement by a pro can cost anywhere from $400 to $2,000+ when you factor in labor.
Final Thoughts
Fixing a rotting door is a crucial step in protecting your home from moisture damage and maintaining its value and security. By carefully diagnosing the problem, you can decide whether a simple epoxy repair or a full replacement is the right solution for you. With the right tools and a little patience, you can tackle this project and enjoy the satisfaction of a job well done.
Feeling a bit overwhelmed or just want a second opinion? That's what we're here for. Download the Casa app today! Our app provides easy-to-follow guides for hundreds of home projects and can connect you with vetted, local professionals for those jobs you'd rather leave to an expert. Take control of your home maintenance with Casa.


